
First of all, I have to say that it isn`t easy to learn something about walnut ink. Of course, there are many homemade recipes all over the Internet, but lack of serious historical sources is alarming. We have many written examples of recipes for medieval iron gall inks, but not single one for walnut ink. More confusing, the Internet says over and over that walnut ink was used by Old masters, especially by Da Vinci and Rembrandt[1]. But again, no credible source of this information could be found.

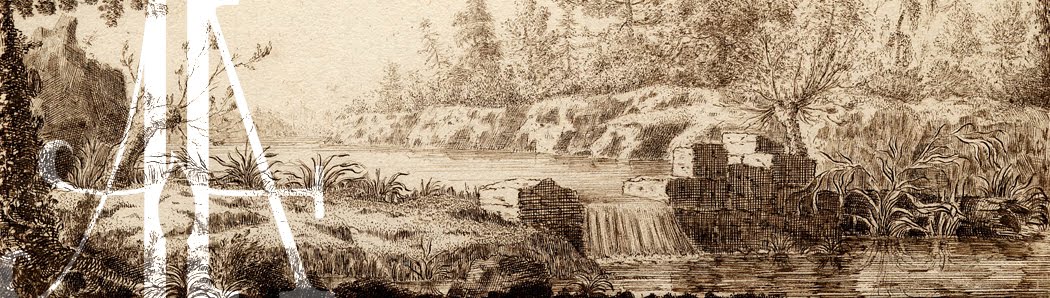
Fig. 1. Da Vinci`s pen and ink drawings are often credited as made with walnut ink, perhaps because of their distinctive brown fade. Leonardo da Vinci - Landscape drawing for Santa Maria della Neve on 5th August 1473, Galleria degli Uffizi, Florence.
Old Masters?
Logically, there are two possible solutions for this: a) walnut ink was never used in medieval and renaissance times as writing and drawing medium, or b) walnut ink was so common and its production was so easy and straightforward, that no one felt urge to write down the recipe.
In favor of the latest statement is that man uses a walnut tree and its fruit for at least 4 000 years.[2] And if you ever touched a walnut husk, it is quite obvious that it stains everything and it couldn`t be easily removed. It`s hard to believe that no one came with idea of making a walnut ink, especially if we know that ink was made of rather strange materials like a pomegranate rinds.[3] Moreover, making walnut ink is really easy - just boil walnut husks in water for several hours and it`s done. Nothing you should worry forgetting. On the other hand, the iron gall ink recipes are often quite complex – using a wine and fermenting for exact period of time with addition of substances not quite common in middle ages like mentioned pomegranate rinds, logwood and others. So once you have found the perfect combination it`s worth to write it down and pass it to the others.

Fig. 2. Another yellow. Mix saffron with the yolke of an eg, and it maketh a faire shining colour. A Booke of Secrets, 1596.
But these are nothing but assumptions and when it comes to the proofs, we have none. It`s known that people who learnt to write in middle ages became somehow graphomaniac and wrote about almost everything – so we have a lot of information about living in this era. It`s very unlikely that no single one ink and color producer or artist ever mentioned walnut ink if it was commonly used. The objection of a relatively simple production of the walnut ink is also irrelevant. We have records of similar simple recipes (see fig. 2.).
Ok. So what about the modern resources? We have record of at least one testing of Rembrandts drawings with x-ray technology. And it says: No walnut ink.[4] Rembrandt used the ferro gallate ink like most artists in his era[5], at least in most of his drawings. There are some credible sources saying that also da Vinci was using iron gall ink.[6],[7]

First of all, I have to say that it isn`t easy to learn something about walnut ink. Of course, there are many homemade recipes all over the Internet, but lack of serious historical sources is alarming. We have many written examples of recipes for medieval iron gall inks, but not single one for walnut ink. More confusing, the Internet says over and over that walnut ink was used by Old masters, especially by Da Vinci and Rembrandt[1]. But again, no credible source of this information could be found.
|
| Fig. 1. Da Vinci`s pen and ink drawings are often credited as made with walnut ink, perhaps because of their distinctive brown fade. Leonardo da Vinci - Landscape drawing for Santa Maria della Neve on 5th August 1473, Galleria degli Uffizi, Florence. |
|
| Fig. 2. Another yellow. Mix saffron with the yolke of an eg, and it maketh a faire shining colour. A Booke of Secrets, 1596. |
Ok. So what about the modern resources? We have record of at least one testing of Rembrandts drawings with x-ray technology. And it says: No walnut ink.[4] Rembrandt used the ferro gallate ink like most artists in his era[5], at least in most of his drawings. There are some credible sources saying that also da Vinci was using iron gall ink.[6],[7]
|
Fig. 3. This Rembrandt`s drawing is sometimes credited as drawn in a walnut ink, but it has been proved that ink is in fact iron gall. Rembrandt - Cottage among trees, cca 1650. Metropolitan Museum of Arts
|
Moreover, it`s commonly known that iron gall ink is highly corrosive – it contains sulfur acid. As time goes it damages paper, oxides and color shift isn`t rare.[8] Freshly made iron gall ink is deep black and corrosion takes some time to occur. This might be source of misinterpretation of medium used by old masters – it looks nothing like fresh iron gall ink.
And lastly, here is one ultimate proof. In this discussion[9] to the Wikipedia article “Ink” could be found statements of authorities from the British Museum. This one citation sums it well: "…the conclusion we have come to is that walnut juice was never used as ink (or at any rate it has never been identified).“ [10] And my conclusion is to stop my investigation – it might seem unlikely, but walnut ink is quite modern. It hasn`t been used as artistic medium until 20th century. At least we have no evidence for earlier use. And we could almost certainly say that old masters didn`t use it.
Finding the right shade
So why even bother and try to produce walnut ink? As you might notice, we are producing handmade art reproductions. And we do it not just to sell them - we are interested in process of making it. So we care for the ingredients used. One way of thinking about art reproductions is in using 100% authentic period ingredients, so reproduction looks like an artwork at the day it was finished. It`s a great feeling to see restored colors in nowadays faded artworks, it`s like traveling in time.[11] But there is the other side: we could reproduce the art in a way it looks nowadays and really, a lot of people are interested in the faded look. The artworks age and gain something hard to describe thought the ages. Aged look gives them regard and people tend to respect it.
We have chosen something in between – we are trying to use authentic materials when there is possibility to achieve present look of an artwork. But when we don`t have such an opportunity, we try to choose the medium that is somehow similar. We don’t exchange oil for acrylic, or watercolor for gouache, and we try not to use synthetic pigments where originally organic ones were used.

Fig. 4. Fresh iron gall ink on the left side, roughly 500 years old one on the right side. Left image by Abigail Bainbridge: http://westdeanconservation.com/2015/03/10/making-testing-iron-gall-ink/, Right image: Jacob de Gheyn II: Mountain Landscape (Detail), The Morgan Library & Museum.
As I stated before, fresh iron gall ink looks nothing like 500 years old one. So we were looking for alternatives. At first we were using Winsor & Newton inks and although they are pretty awesome, it wasn`t quite what we were looking for. Walnut ink looks very much like faded iron gall as we have proven before. With the love we have for the homemade art supplies it was just one small step to cooking our own. It`s not quite 100% authentic but it`s 100% organic, contains similar iron - tannin molecule bond (which gives it its color), and it`s made in similar way. And this is kind of compromise we could go along with.
Production guide
There are two main options in making walnut ink. You could do it with or without the iron. In general the iron ink is deeper and darker than ironless, which has dirt-like color. That`s all you really need to know. Just toss some husks in water (preferably distilled) and boil it. Then filter it through cheesecloth, toss some rusted nails in it and boil until it has desired shade and thickness. You might add some gum Arabic, but really don`t have to. And viola, it`s done. You`ll figure it out alone, it`s not any science (maybe just little happy science) but if you are interested in more detailed view on the process of ink-making, just read further.
Ingredients:
- 800 ml distilled water (don`t use tap water – it may contain chlorine, which reacts with tannins in husks)
- 130 g walnut husks (use any husks you could find – fresh green one, black and dry one are ok as well)
- 50 g rusted nails (or anything rusted made of iron)
- >1g gum Arabic
Equipment:
- Aluminium or other nonreactive pot (at least 1l in volume)
- some glass containers
- brush and paper
- cheesecloth
- cotton wool
- heavy duty latex gloves

Fig. 5. Some of the ingredients. Note the dark black colour of the walnut husks in the lower left corner.
1. Place the husks in a pot and add water. Put on a stove on medium heat, put the lid on. Don`t boil the mixture. Keep it warm enough to steam but there shouldn`t be visible bubbling. Stir often.
2. After 4 hours of simmering, the mixture should look like a dirt. Let it cool down and then filter it through the cheesecloth. Don`t forget to use latex gloves. Squeeze as much liquid from the mixture as you can to a large glass. Discard the dry husks.

|
Fig. 4. Fresh iron gall ink on the left side, roughly 500 years old one on the right side. Left image by Abigail Bainbridge: http://westdeanconservation.com/2015/03/10/making-testing-iron-gall-ink/, Right image: Jacob de Gheyn II: Mountain Landscape (Detail), The Morgan Library & Museum.
|
|
| Fig. 5. Some of the ingredients. Note the dark black colour of the walnut husks in the lower left corner. |
|
| Fig. 6. The image is showing progress during the first phase of boiling before filtering. Note that ink is getting gradually darker, but there are large particles visible. |
3. Wash the pot and place the liquid in it. If you want to make iron ink, add rusty nails. Put on medium heat and again - watch it not to boil, just steam. Simmer uncovered, let the water evaporate. Stir often.
4. After about 2 hours remove nails and keep the pot on the stove. Get a brush and try ink on paper – if thin, continue simmering until it has desired shade and consistency.
5. When ink is ready, filter it through the cotton wool. Just place a little ball of cotton wool in a funnel and pour ink through it.
6. Add gum Arabic – just on the tip of a spoon. Mix well until gum dissolves.

Fig. 7. Progress during the second phase of boiling. Description in the text.
Notes:
In my case, the final yield of ink was circa 100 ml.
The second phase of boiling is crucial. It`s when ink gains its colour. In the fig. 7. you could see the progress during the second phase. On the left side, there are samples of the ironless ink, on the right side samples of the ink with the addition of iron. The inks are very thin after filtering but gradually darken due the evaporating of water and iron oxidation. Adding gum Arabic makes pigment distribution more uniform.
Testing ink
Water resistance test
We tested our inks for water resistance. Fig. 8. shows the comparison with one waterproof medium (in this case Winsor & Newton Peat Brown Ink) and one medium that is not water-resistant (Talens Ecoline Sepia 416).

Fig. 8. Water resistance test. Description in the text.
Neither of our walnut inks is water resistant. The non-iron ink has better results but is still far from the performance of waterproof Winsor & Newton ink. It's not surprising. The walnut ink is known as non-waterproof medium and as such could be used for ink wash techniques.
Lightfast test
In progress.
Conclusion
So, walnut ink wasn`t used by Da Vinci or Rembrandt, but it isn`t really reason for you to skip it. It has nice colour (and smells good, too) and is quite popular among calligraphers. We decided to give it a try and wasn`t disappointed.
One issue we are currently testing for is a light stability. We really don`t know whether it is or isn`t lightfast. So we run a small test comparing it with some popular inks and results will be available in one month or so.
Meanwhile you could boil your own ink - walnut trees grow almost everywhere around the globe, so grab some husk and boil it - it`s easy and free. Feel free to ask any questions in comment section.

Fig. 9. Our walnut inks. On the left is ink without added iron (marked NO•Fe), on the right iron walnut ink. Walnuts in the photograph are from the same tree as husks used to produce ink.
So this is our guide to walnut ink and our first blog post ever. Now we are working on many tasks. We are finishing some drawings, which you`ll find in our Etsy shop in no time. We are exploring new drawing media - bistre, lampblack and iron gall ink - so perhaps there`ll be another blog about inks in the near future. Moreover, we are studying the symbolism of the Northern Renaissance drawings, so you could expect small theorethical works on this blog, too. So stay tunned - more awesome stuff is comming.
If you want to support us, you could follow our instagram @art_after or like our facebook page. We would love any replies and questions.

[1] Just this one example: http://www.artmaterialsretailer.com/articles.php?view=article&id=118
[7] Bambach, C., Stern, R., Manges, A.: Leonardo Da Vinci Master Draftsman: Catalogue to an Exhibition at The Metropolitan Museum of Art, New York 2003, pages: 43, 150, 523. Online at: https://books.google.cz/books?id=QwQxDJMKRE4C
[11] See this article about restored copy of da Vinci`s famous La Gioconda to see how colorful world was even in renaissance: http://www.nytimes.com/interactive/2012/04/14/world/europe/Not-Just-Another-Fake-Mona-Lisa.html
|
| Fig. 7. Progress during the second phase of boiling. Description in the text. |
|
| Fig. 8. Water resistance test. Description in the text. |
Conclusion
So, walnut ink wasn`t used by Da Vinci or Rembrandt, but it isn`t really reason for you to skip it. It has nice colour (and smells good, too) and is quite popular among calligraphers. We decided to give it a try and wasn`t disappointed.
One issue we are currently testing for is a light stability. We really don`t know whether it is or isn`t lightfast. So we run a small test comparing it with some popular inks and results will be available in one month or so.
Meanwhile you could boil your own ink - walnut trees grow almost everywhere around the globe, so grab some husk and boil it - it`s easy and free. Feel free to ask any questions in comment section.
So this is our guide to walnut ink and our first blog post ever. Now we are working on many tasks. We are finishing some drawings, which you`ll find in our Etsy shop in no time. We are exploring new drawing media - bistre, lampblack and iron gall ink - so perhaps there`ll be another blog about inks in the near future. Moreover, we are studying the symbolism of the Northern Renaissance drawings, so you could expect small theorethical works on this blog, too. So stay tunned - more awesome stuff is comming.
If you want to support us, you could follow our instagram @art_after or like our facebook page. We would love any replies and questions.
Meanwhile you could boil your own ink - walnut trees grow almost everywhere around the globe, so grab some husk and boil it - it`s easy and free. Feel free to ask any questions in comment section.
| |
|
If you want to support us, you could follow our instagram @art_after or like our facebook page. We would love any replies and questions.
[1] Just this one example: http://www.artmaterialsretailer.com/articles.php?view=article&id=118
[7] Bambach, C., Stern, R., Manges, A.: Leonardo Da Vinci Master Draftsman: Catalogue to an Exhibition at The Metropolitan Museum of Art, New York 2003, pages: 43, 150, 523. Online at: https://books.google.cz/books?id=QwQxDJMKRE4C
[11] See this article about restored copy of da Vinci`s famous La Gioconda to see how colorful world was even in renaissance: http://www.nytimes.com/interactive/2012/04/14/world/europe/Not-Just-Another-Fake-Mona-Lisa.html
What were the final results of the light fastness test?
ReplyDeleteHow did the light fastness test go?
ReplyDeleteThanks for this! I'm also keen to know the results of your light-fastness test.
ReplyDeleteI think everyone here is really interested in the light-fastness... :) thank you wonderful post!
ReplyDelete